Summary
- A load bearing wall transfers the weight of floors, the roof, and upper stories down into the foundation. Removing one without engineering support can cause structural failure.
- A non load bearing wall, also called a partition wall, divides space and carries only its own weight. It can be removed or repositioned without affecting the building’s structure.
- All exterior walls are load bearing. Many interior walls are too, particularly those running perpendicular to floor joists or positioned near the center of the home.
- Visual clues — wall thickness, joist direction, basement alignment — narrow the field, but only a licensed structural engineer can confirm with certainty.
- Removing a load bearing wall costs between $1,400 and $10,000 on average, depending on wall length, beam type, and whether utilities need rerouting.
- A non load bearing wall removal typically runs $500 to $1,500 — significantly less, because no beam installation is required.
Picking the wrong wall to remove can result in sagging ceilings, cracked floors, or partial structural collapse. The difference between load bearing and non load bearing walls is one of the most important distinctions in residential construction, and it matters whether you are renovating a kitchen, opening up a living room, or finishing a basement.
This guide breaks down what each wall type does, how to tell them apart, what goes wrong when the identification goes wrong, and what the removal process actually looks like for each.
What a Load Bearing Wall Does
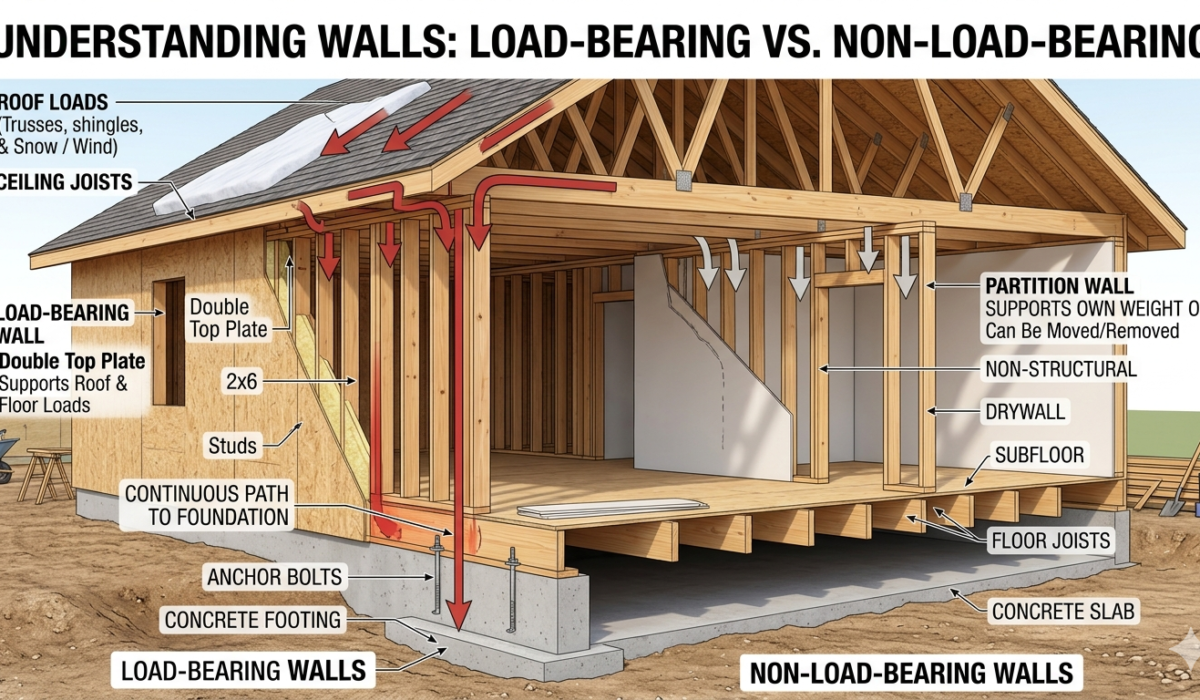
A load bearing wall supports the weight of the structure above it and transfers that load downward through the building into the foundation. In a two-story home, that means a load bearing wall on the first floor may be carrying the combined weight of the second floor, the ceiling joists, the roof framing, and, in cold climates, the accumulated snow load on the roof.
The load path is direct: slabs and floor systems pass weight to the walls, walls pass it to the foundation, and the foundation distributes it to the ground. Interrupt that path by removing a wall, and the weight has nowhere to go — or, more accurately, it goes somewhere unintended. Joists deflect. Ceilings sag. In severe cases, the floor above drops.
Load bearing walls are found in predictable locations, though exceptions exist. Every exterior wall falls into this category — no exceptions. Interior load bearing walls tend to run perpendicular to the floor joists, often appear near the center of the home, and frequently sit directly above a beam or post in the basement or crawl space below. In multi-story homes, they often stack from floor to floor on the same line.
Materials used in load bearing walls reflect the structural demand. Concrete, masonry block, and reinforced brick are common in older construction. Wood-framed load bearing walls typically use 2×6 lumber rather than the 2×4 stock found in standard partition walls, and they are heavier and thicker as a result.
What a Non Load Bearing Wall Does
A non load bearing wall, also referred to as a partition wall or curtain wall, carries only its own weight. It divides interior space into rooms and corridors, provides surfaces for finishes and fixtures, and often houses electrical wiring, plumbing, and HVAC ductwork — but it contributes nothing to the vertical load path of the building.
Removing a partition wall will not affect the building’s structural integrity. The floor above it, the ceiling, and the roof continue to be supported by the load bearing elements elsewhere in the frame. That flexibility is what makes partition walls attractive targets during open-concept renovations.
Construction reflects the lighter duty. Non load bearing walls are typically framed with 2×4 studs, often spaced at 24 inches on center rather than the 16-inch spacing common in structural framing. Lighter materials such as gypsum board, metal studs, or thin wood panels are frequently used. Openings for doors and windows can be wider in partition walls because no structural header is needed to transfer load across the gap.
One common misconception: removing a non load bearing wall is always simple. It often is not. Even walls that carry no structural weight can house gas lines, drain pipes, or the main electrical panel feed. Relocating those utilities can add $500 to $2,000 to a project that might otherwise be straightforward.
Key Differences at a Glance
The table below summarizes how load bearing and non load bearing walls compare across the factors that matter most during a renovation:
| Feature | Load Bearing Wall | Non Load Bearing Wall |
|---|---|---|
| Structural role | Transfers weight to foundation | Divides space only |
| Typical framing | 2×6 or thicker lumber | 2×4 lumber |
| Stud spacing | 16 inches on center | 16 or 24 inches on center |
| Location | Exterior walls, perpendicular to joists | Anywhere interior design requires |
| Door and window openings | Smaller, with structural headers | Larger, headers not structurally required |
| Removal complexity | High — requires beam, posts, permits, engineer | Low to moderate — utilities may still complicate |
| Average removal cost | $1,400 to $10,000+ | $500 to $1,500 |
| Permit required | Yes, in virtually all jurisdictions | Yes, in most jurisdictions |
How to Tell Load Bearing from Non Load Bearing
This is where homeowners most often go wrong. A wall’s appearance gives limited information. Some partition walls look substantial. Some load bearing walls are tucked behind drywall with no visible indication of their structural role. The clues below are useful starting points, but none of them are definitive on their own.
Check the Basement or Crawl Space First
The fastest reliable clue is what sits directly below the wall in question. Head to the basement or crawl space and look for beams, posts, or girders running parallel to the wall above. If the support structure below mirrors the wall line above, that wall is almost certainly carrying load. A continuous post embedded in or resting on the concrete foundation below a first-floor wall is a strong indicator.
In homes without a basement, accessing the crawl space through an access panel will show the same. The direction the floor joists run is visible from below, and that direction is the next most useful clue.
Joist Direction
Load bearing walls run perpendicular to the floor joists. This is basic structural logic: the wall intercepts the span of the joists and provides mid-point support. A wall running parallel to the joists above is carrying none of their load and is almost certainly a partition.
Stand under the floor joists in the basement and trace their direction. Then mentally draw a line 90 degrees from that direction. Walls running that way are the candidates for load bearing status. As a practical example: if joists run north to south, the load bearing walls run east to west.
The caveat worth noting: joist direction is a clue, not a conclusion. Structural engineers at Load Bearing Wall Pros, a Texas-based wall removal company that has identified over 12,000 walls since 2015, note that some walls running parallel to joists still carry load due to how the original engineer designed the truss or framing system. Visual clues build a working hypothesis. A professional confirms or rules it out.
Wall Stacking Across Floors
In multi-story homes, load bearing walls typically stack. A wall on the second floor sitting directly above a wall on the first floor, which in turn sits above a beam in the basement, forms a continuous load path. Walk the floors of the home and look for interior walls positioned on the same line from floor to floor. That pattern is a reliable indicator of a structural load path.
Wall Thickness and Materials
Standard non load bearing interior walls measure about 4.5 inches thick, which accounts for 2×4 framing plus drywall on each face. Load bearing walls are often thicker — over 6 inches in wood-framed construction, and substantially thicker in concrete or masonry construction. A wall that appears unusually solid or is made from brick, block, or poured concrete in an otherwise wood-framed home is almost certainly structural.
The Attic View
For first-floor walls in single-story homes, or second-floor walls in two-story homes, the attic provides direct evidence. Look at the ceiling joists running above the wall. If they are spliced together over the wall — meaning two separate joist runs meet and overlap directly above it — the wall is carrying the weight of those spliced joists. If the joists run continuously past the wall without any splice or connection, the wall below is likely a partition.
Original Blueprints
The home’s original architectural drawings are the most accurate source. A structural or framing plan will label load bearing walls directly and show how the load path runs through the building. Copies of original plans are available from local building departments in most jurisdictions for a nominal fee. If the home has been renovated since original construction, the drawings may not reflect current conditions — but they provide a useful starting point.
Where Visual Clues Fall Short
Past renovations are the most reliable way to make standard identification methods unreliable. Structural loads can be redirected through hidden beams concealed above drywall ceilings. A previous owner may have removed a wall without a permit and added a hidden beam that now carries load that used to be distributed differently. A wall that appears to be a simple partition may have been retrofitted as a support point for a sagging floor.
In older homes — particularly those built before the 1980s, when compartmentalized layouts were standard — framing patterns are less consistent. Non-standard engineering decisions made decades ago by builders who did not document changes are common.
The only way to confirm load bearing status with certainty is to have a licensed structural engineer evaluate the wall. They examine the framing, trace the load path from roof to foundation, review available drawings, and provide a written assessment. For most residential projects, that evaluation costs between $300 and $800 — a small number relative to the cost of repairing structural damage caused by misidentification.
What Happens When a Load Bearing Wall Is Removed Without Support
The consequences range from cosmetic to catastrophic, and they do not always appear immediately. In some cases, structural problems from an improperly removed load bearing wall take months or even years to become visible — often surfacing during a home inspection when the property is later sold.
Sagging ceilings are the most common early sign. Without the wall to intercept the joist span, the floor above deflects at the midpoint. That deflection creates a visible bow in the ceiling below and can cause cracks along drywall seams. Doors and windows near the affected area begin to stick or fail to latch as the frames shift out of square.
More serious cases involve joist separation, where the connection between the floor framing and the now-unsupported span begins to fail. At that stage, repair costs exceed the cost of the original renovation many times over. Structural damage from a DIY wall removal frequently costs more to fix than a properly executed removal with a structural engineer would have cost from the beginning.
Removing a Load Bearing Wall the Right Way
The process has a defined sequence, and skipping any step creates risk.
Hire a Structural Engineer First
Before any demolition, a structural engineer determines the size and type of beam required to carry the load the wall currently bears. This is not a task for a general contractor alone, and it is not a judgment call a homeowner can make based on online research. Beam sizing requires calculations that account for the span, the load above, and the capacity of the posts and footings that will support the beam’s ends.
Engineering fees for a straightforward residential wall run $300 to $500 for a short wall with a single load path. Complex two-story situations with multiple load contributors may cost $800 to $1,500 in engineering fees. The engineer produces stamped drawings that the contractor uses during construction and that the building department requires for permit approval.
Pull the Permits
Load bearing wall removal requires a permit in virtually every jurisdiction in the United States. The permit triggers a plan review to confirm the engineered beam design meets local code, and it schedules inspections at key stages of the work. Skipping the permit creates risk: if structural work is done without a permit and the home is later sold, the buyer’s inspection will flag it. Unpermitted structural work can derail a sale, reduce appraised value, or force a retrofit at the seller’s expense.
Install Temporary Support Walls
Before the load bearing wall comes down, temporary shoring walls are built on either side to carry the weight of the structure above during the transition. These are typically 2×4 walls with a horizontal plate pressed against the ceiling and studs secured below. They hold the load while the permanent wall is removed and the beam is set into place.
Proper temporary shoring is as important as the permanent beam. Without it, the load has nowhere to go the moment the wall is compromised, and the ceiling can begin to deflect before the new beam is in position.
Remove the Wall and Set the Beam
Once shoring is in place, the drywall is stripped, the framing is cut out, and the wall is removed. Posts are installed at each end of the opening to support the new beam, and those posts must bear down on a structural element below — a beam or footing in the floor system, not just the subfloor. The engineer’s drawings specify post size and footing requirements.
The beam itself is then lifted and set into the pockets prepared at each end. Beam material choices affect cost. A laminated veneer lumber (LVL) beam costs $60 to $300 for materials on a short span, while a steel I-beam for a longer span runs $1,000 to $3,000 for the beam alone before installation labor. LVL costs 50–70% less than steel and is faster to install; steel allows longer clear spans without intermediate posts.
Reroute Any Utilities Inside the Wall
Load bearing walls frequently house electrical wiring, plumbing, and HVAC ductwork. These must be relocated before demolition. Rerouting a few electrical circuits costs $300 to $800. Moving a drain line adds $500 to $1,500 depending on distance and accessibility. HVAC ductwork relocation runs $800 to $2,000. None of these costs show up in a rough estimate; a contractor should open a section of the wall before providing a final price.
Finish and Inspect
After the beam is set and the shoring is removed, drywall patching, texture matching, and paint complete the cosmetic work. A basic patch job runs $500 to $800. Concealing the beam fully in the ceiling — the flush beam approach — adds $1,200 to $2,000 for the framing, drywall, and finish work. Some homeowners opt to leave the beam exposed, which saves the drywall cost and may work as a design feature with appropriate staining or wrapping ($300 to $600).
The building inspector then visits to verify that the beam meets the engineered drawings, that the posts bear properly on structural elements below, and that the finished work complies with code.
Removing a Non Load Bearing Wall
The process is shorter and the stakes lower. A permit is still required in most jurisdictions — any interior structural change, however minor, typically needs approval — but no engineering fee applies and no beam installation is needed.
The wall is stripped of drywall, the studs are cut out, and the top and bottom plates are removed. If the wall is on an exterior surface or connects to a structural member, temporary care is needed to avoid disturbing the adjacent framing. Utilities inside the wall are the main complication: electrical circuits, cable, and any plumbing must be capped, rerouted, or extended before the demolition proceeds.
Total cost for a straightforward non load bearing wall removal runs $500 to $1,500, depending on wall length and utility complexity. Homeowners comfortable with basic carpentry sometimes handle the drywall removal themselves to reduce labor costs, then bring in a licensed electrician for any wiring changes
Partition Wall vs Load Bearing Wall in Different Home Types
The rules above apply broadly, but some home types carry specific patterns worth knowing.
In ranch-style single-story homes, the load bearing interior wall typically runs down the center of the home, parallel to the roof ridge, providing mid-span support to the ceiling joists and roof rafters. Walls running toward the exterior at right angles to that center wall are usually partitions.
Split-level homes present a more complex picture. The stepped floor levels mean load bearing points shift at each transition, and walls at level changes are often structural regardless of their orientation to the joists. A structural engineer is worth consulting before any demolition in a split-level.
In homes with engineered roof trusses — common in construction from the 1980s onward — interior walls are less likely to be load bearing, because the trusses span the full width of the home and bear only on the exterior walls. However, attic knee walls and walls supporting point loads from truss connections can still be structural even in truss-framed homes.
Older balloon-framed homes (built roughly before 1930) use wall studs that run continuously from foundation to roof plate — a single long stud rather than the stacked platform framing used in modern construction. In balloon framing, almost every wall is load bearing to some degree, and alterations require extra care and engineering review.
Common Mistakes to Avoid
Trusting appearance over evidence is the most frequent error. A thin wall can be structural. A thick wall can be a partition. The visual indicators are clues that need confirmation, not conclusions.
Relying on a general contractor’s word without an engineer’s assessment is also risky. Experienced contractors can often identify load bearing walls from pattern recognition, but pattern recognition is not the same as engineering analysis, particularly in homes that have been altered over time.
Skipping permits to save time or money creates problems that surface later. Unpermitted structural work will appear in a home inspection, and the remediation required to bring it into compliance often costs more than the permit would have.
Forgetting that utility lines live inside walls — both load bearing and partition — leads to mid-project surprises that inflate costs and delay timelines. Opening a small section of the wall before finalizing a budget is standard practice among experienced contractors.
Assuming open-concept renovations always add resale value overstates the case. In most markets, an open floor plan is desirable, and a well-executed wall removal can increase buyer appeal. Whether it adds more value than it costs depends heavily on the home’s price point, neighborhood, and the quality of the finish work after removal.
When to Call a Structural Engineer
Any time there is genuine uncertainty about whether a wall is load bearing, the engineer call is the right move. The assessment fee of $300 to $800 is minor relative to the cost of structural remediation.
Certain scenarios make professional consultation non-negotiable. Multi-story walls, walls adjacent to staircases or fireplaces, and walls in homes with non-standard framing or a history of undocumented renovation all carry elevated risk. Walls in areas prone to seismic activity or high wind loads may also carry lateral bracing functions in addition to vertical loads — a function that is not visible and that visual inspection will not reveal.
The engineer’s role does not end at identification. If the wall is load bearing and the homeowner wants it removed, the engineer designs the replacement beam, specifies the post sizes and footing requirements, and produces permit-ready drawings that the contractor builds from. That document protects the homeowner legally, satisfies the building department, and gives the contractor a clear scope to price accurately.
Getting a structural engineer on-site at the start of a project is always faster and less expensive than getting one on-site to assess the damage after a wall removal goes wrong.
The Bottom Line
Load bearing walls carry the weight of the structure above them and transfer it to the foundation. Non load bearing walls divide space and carry nothing more than their own weight. The distinction determines whether a renovation project requires a structural engineer, an engineered beam, and a permit process with inspections — or whether it is a straightforward demo job.
Most exterior walls are load bearing. Most center-of-home interior walls running perpendicular to the floor joists are load bearing. Walls running parallel to joists, positioned away from the structural core, are likely partitions — though past renovations can scramble that pattern in ways a visual inspection will not catch.
Before any wall comes down, confirm its role through the available evidence: basement alignment, joist direction, wall stacking, attic splice patterns, and the original blueprints if accessible. When the evidence is ambiguous, a structural engineer’s assessment is the only reliable answer. The $300 to $800 it costs is far less than the $5,000 to $30,000 that structural remediation can run when the identification goes wrong.